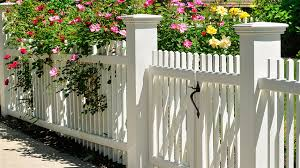
Adding trellis structures to fences creates a unique and beautiful aesthetic while providing support for climbing plants. It’s also a great way to add privacy and protect gardens from wind or rain.
Taking accurate measurements is a vital part of the process. This ensures that the fence is placed properly on your property and adheres to local regulations regarding setbacks. Contact Fence Installation Lansing MI now!
The preparation process begins with the evaluation of your property. This step involves a thorough check of the ground surface to make sure it is level. It is a crucial part of the fence installation process as it ensures that your new fence will be sturdy and long-lasting. This also helps to avoid any costly mistakes during the building process.
Once the evaluation is complete, it is time to begin digging the post holes. This step is a vital aspect of the fence installation process as it provides the foundation for your new fence. The quality of the holes can have a major impact on how stable your finished fence will be. It is important to dig the holes deep enough to be stable after being filled with concrete. It is a good rule of thumb to use a depth that is equal to your chosen fence height.
When digging your fence posts, it is important to keep in mind any existing landscape features that may interfere with your installation. For example, your yard might have rocks or other natural obstacles that must be taken into consideration. It is also important to be aware of any underground utility lines that could be affected by your project. Contacting your local utility company in advance can save you from expensive and potentially hazardous mistakes.
After the corner posts are firmly placed, it is important to string a line between them to guide the straight placement of intermediate posts. This will ensure that your fence is structurally sound and evenly spaced.
Before the final stages of the fence installation process, it is important to apply a coat of primer to the entire wooden surface. This will help to prevent mold and provide a smooth surface for the topcoat. After applying the primer, it is important to allow it to dry thoroughly before continuing.
If you are installing a decorative fence, it is a good idea to apply a coat of sealer or stain. This will protect the wood from moisture and harsh weather elements and prolong its life. After the sealer or stain is applied, it is important to let it dry completely before using the fence.
Post Installation
The first step in any fence project is laying a strong foundation, and this means digging the post holes. While it’s a time-consuming part of the process, it’s essential to the success and longevity of your fence. To help make things go a bit more smoothly, you should use a post-hole digger or power auger if possible. Also, consider your soil type. For instance, rocky or sandy ground may require deeper hole depths to provide stability.
Once the posts have been dug, you’ll want to backfill them with gravel for drainage and to protect against frost and heaving. You’ll also want to brace them with stakes or wood 1” x 4” boards, and it’s a good idea to use concrete for additional strength. You can mix a batch of concrete in a wheelbarrow or purchase products that expand into the ground to ensure stable, long-lasting posts.
Next, you’ll attach the bottom rail to your fence posts. This is a crucial step that ensures that your fence will be level and secure, and it’s important to follow the guidelines set by your local codes and property lines. This will help you avoid disputes with your neighbors and keep the structure safe for both you and them.
Finally, you’ll want to add a bead of silicone caulk to the top of each post to further protect them from moisture and weather elements. At this point, you can also install your fence posts’ caps, which are available in a variety of styles and finishes to match your new fence’s aesthetic.
Many homeowners opt to use driven fence posts instead of concrete footings, which helps save time and money. This technique also ensures that your fence will stand up to the freeze-thaw cycle of Minneapolis’ harsh climate. If you’re considering this option, be sure to ask your installer if they use cemented posts as well, which can greatly increase their lifespan. Once the posts are installed, you’ll be ready to build the rest of your fence!
Rails & Panels
A fence is not complete without rails and panels. These horizontal elements connect the posts and provide support for the slats of the fence. They can be crafted from the same material as the pickets or boards to create a seamless and visually appealing look, or they can be a different type of wood or even a composite material for enhanced durability. They may be wider than the pickets to add contrast and visual interest. They also help keep the slats elevated from ground moisture, preventing decay and making it easier to trim grass that may be present.
Before beginning to dig, lay out your fence line with stakes for each corner, end and gate post location. This will serve as a guide to ensure all the posts are properly aligned and spaced. You’ll also want to mark where the utility, drainage and sewer lines are located. You can usually find these on your plot plan or by contacting a professional surveyor. It’s important to identify and mark these areas prior to digging as hitting a line during installation can be extremely expensive, not to mention dangerous.
Once the ground has been cleared and leveled, dig holes for each of your fence posts. Place a small amount of gravel in each hole to allow for drainage and to help level the area. Once the holes are dug, install each post. Begin with the corner and end posts, then work your way outward. Once the posts are set, a carpenter’s level should be used to ensure they’re plumb. Next, mix concrete and fill each hole up to 2″ below the top. When the concrete is poured, place a block under the post to keep it from sinking.
Once your posts have been installed, it’s time to install the rails. It’s best to start at the end of your fence, setting the first rail flush to the edge of the post. Then, work your way towards the other end, using a level to make sure each rail is plumb and evenly spaced.
When installing your fence panels, be sure to follow the manufacturer’s instructions carefully. Typically, the panels will be attached to the rails by using screws. Be sure to use exterior-grade fasteners that are rated for pressure treated wood.
Final Touches
The proper installation of fence posts is critical to the stability and durability of a wood fence. The skeleton of the fence, these posts will support both horizontal rails and vertical planks. During this step, it is vital to carefully plot out the fence line and ensure that the posts are set at the correct depth and properly aligned.
In addition, this is an excellent opportunity to install any decorative elements that can be added to the fence to enhance its aesthetic and personalize its design. This may include post caps, lattice panels, or trim. However, these add-ons will increase overall costs and should be planned accordingly.
Once the posts are in place, it’s time to begin assembling the fence panel and rails. This is a very time-consuming task, and it’s essential to ensure that the slats are properly secured and evenly spaced. It’s also a good idea to periodically check that the fence is secure and free from any signs of damage. Regular inspections can help to catch small issues before they become major problems, saving you money and headaches down the road.
To help make this process easier, it’s important to consider the availability of your team before getting started. This includes assessing your skills, knowledge, and experience as well as considering factors such as scheduling, weather conditions, and the physical demands of digging post holes or carrying heavy materials. It’s also crucial to understand if any permits or permissions are required for the project and to obtain them in advance if necessary.
If you do not have the time, skill, or equipment to perform fence installation yourself, hiring professional contractors can be a smart and affordable option. Most fencing companies charge by the hour and rates can vary depending on location, complexity, and materials needed. When working with professionals, be sure to get a detailed written estimate outlining all expected costs and services. It is also a good idea to ask about any potential additional charges such as staining or painting, which will add to the total cost of the project.